
Planning a roof replacement? Feeling like you’re stuck in a whirlwind of contractor quotes, inspections, and budget breakdowns? We totally get it. It can feel like planning a family vacation, minus the excitement of picking a destination.
But here’s some good news: you’ve already conquered the hardest part, which is deciding it’s time for a new roof. That alone deserves a round of applause. So kick back, grab your favorite chair, and let the roofing pros take it from here.
At RoofCrafters, we’ve been guiding homeowners like you through stress-free roof replacements for over 30 years. Think of us as your personal GPS for the roofing journey, steering you toward peace of mind with fewer bumps along the way.
Whether you’re still in research mode or ready to dive in, our handy 9-step guide will help you understand the full roof replacement process, from permits to final cleanup. Let’s get started!
Why Your Roof Installation Day Matters More Than You Think
We get it, replacing a roof is a major investment. A well-installed roof can last decades, giving you lasting protection and peace of mind. But not all roofing contractors are created equal. Some cut corners, rush through the installation, or ignore key manufacturer guidelines.
Here’s the deal: the day your new roof is installed is the single most important day of the entire process. That’s why it’s critical to work with a licensed roofing contractor who knows the right techniques and follows a tried-and-true process. Let’s walk through the essential 9-step roof replacement process so you know exactly what to expect.
Step 1: Get Your Permits in Order
The first step in your roof replacement process is to have all the required permits from your state and local building departments. This may include any special homeowner association or architectural review board permits. Some community HOAs(Home Owners Associations) or ARBs(Architectural Review Boards) regulate the type of roofing materials allowed. Which may include the colors you are able to select.

The permit process is in place to let your contractors know of any specific material and installation requirements that are needed for your particular geographic area. You don’t want to have a new roof installed only to find out later that the material type or color is not allowed in your community. Having all permits in place assures you and your contractor this won’t happen!
Step 2: Prepping Your Property
The first thing your contractor will do when they arrive is set up your job site. This is done by moving items that could potentially get damaged such as outdoor furniture, grills, and pottery plants.
Your contractor may ask you to move any vehicles out of your garage or driveway that you will need access to while the roof replacement is being completed. This will keep your vehicles from getting damaged and give you access to them, should you need to leave your home for any reason during the project.
Step 3: Safety First
One of the most important jobs your contractor has to do is make sure you and everyone on your property are safe. This requires setting your job site up with the right equipment. First, the most important thing is to make sure no one gets injured on your property. Next is to make sure your property does not get destroyed during the tear-off process.

The crew has the right safety equipment for your roofing project, along with the proper set-up of barricades and tarps to ensure that the job site stays safe during the tear-off process.
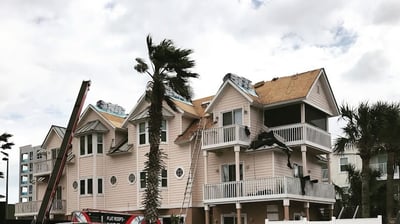
Step 4: Tear-Off Time
During the tear-off portion of the project, the roofing crew will use special tools designed to pry up the old roofing materials. The two most common tools that are used are spades and pitchforks. The crew will go over your existing roof with one of these tools and remove all of the old materials section-by-section to prepare the decking for your new roof installation.
The tear-off will also include removing the old components such as metal eave drip, underlayment, pipe boot flashing, and any metal or plastic vents that may be on the old roof. This will ensure a great installation of your new roof.
Step 5: Material Delivery
Your contractor may schedule the new roof material to be delivered the day your roof replacement starts. Coordinating the new materials to be delivered once the old roof has been torn off will keep your contractor from loading the new materials on your old roof. They would have to be moved again to tear the old roof off.
This requires a little more effort and communication with the local supply house but saves both time and money down the line. Depending on your roof type and the complexity, your contractor may choose to ground set the materials. It may help your roof replacement run more smoothly.
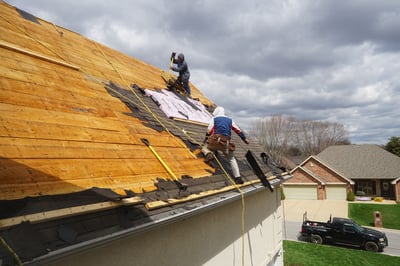
Step 6: Roof Installation
Once your old roof is torn off and your new roof materials have been loaded. Your contractor will begin to install your new roof. To ensure you get a high-quality installation, they'll follow all state and local building codes, as well as manufacturers' installation guidelines.
The roof will be installed section by section. All the roofing components that make up the entire roof system will get installed in their correct order. Having both experienced installers and using quality materials will ensure that you get the most lifespan from your new roof replacement.
Step 7: Cleanup
After your new roof is installed your contractor will start the final clean-up. They will begin by cleaning all the debris from the new roof and gutters. Once the roof and gutters are clean, they will start cleaning the ground. You can expect this to take an hour or so depending on the size of your home.

The crew will remove all the tarps and pick up all the roofing debris from around your home and in your landscaping. Once all the debris is removed the crew will run magnets to pick up the loose nails around the perimeter of your home. This usually needs to be done 3 or 4 times to get the nails up.
Step 8: Debris Disposal
To get a new roof, the old roof will need to be torn off. Most roofing materials that get removed will need to be taken to special construction dumps. These dumps are designed to handle all the different materials used in the roofing products. Like the petroleum in asphalt shingles.
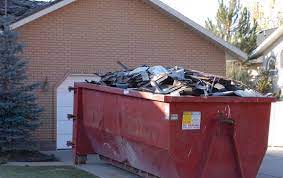
Depending on the type of materials removed, in some cases, materials can be recycled. Which could reduce the cost of your roof replacement. Either way, to get rid of the old materials, they need to be handled by labor. Put into dump containers and then transported by a CDL class driver. Once your job site is completely clean, your contractor will remove the dump container and clean up around the spot it was positioned on your property.
Step 9: Final Inspection
After your roof has been installed. Your property clear and looking great again. The contractor will have a quality control person or job supervisor come out. They'll perform a complete walk-through to double-check for quality. They'll get on the roof and inspect the installation to make sure that you will be left with the highest quality workmanship possible for the materials you invested in.
By double-checking the areas that are most prone to leaks such as chimneys, skylights, pipes, vents, and all roof-to-wall details. You'll surely get left with the best roof installation. No matter who you hire, a contractor that double-checks their own work is sure to have fewer issues.
Ready to Replace Your Roof? Let’s Get Started
Feeling like a roof replacement pro yet? You should! With this 9-step guide in hand, you’re more than ready to take on your roofing project with confidence. So, go ahead, sit back, and enjoy the process. Watching your home transform with a beautiful, durable new roof is as satisfying as it gets!
Still need to hire a roofing contractor? RoofCrafters has created a checklist of the top questions to ask your local roofing contractor, plus the answers you should expect to hear.

If you’re in Florida, Georgia, or South Carolina, schedule your free inspection today. We’ll help you kick off your roof replacement journey the right way. Want to learn more? Check out our full Roof Replacement Guide to dive deeper into the process.
